# Which Google Camera to install and use »
Read this page: How to use this port.
# How to install Google Camera? »
.apk files are Android applications. After downloading the APK file (how to find a good version), you need to install it.
Using a file manager/explorer app, tap on the .apk file and follow the instructions. If you need help, see how to install an apk file on Android.
# Google Camera not installing (App not installed) »
Sometimes, installation fails (“App not installed,” “Parsing error,” “Installation failed,” etc.). Some possible reasons and fixes:
- First, uninstall other GCam port versions: Sometimes, you need to manually uninstall the GCam app that is already installed before you can install a new version.
- Incompatibility with your Android version: Google quickly drops support for older Android versions. Modders can often make the latest Google Camera version work on older Android versions, but it’s not always the case. If you don’t have the latest Android version installed, that might be why Gcam cannot be installed. Try an older version.
- Corrupted download: Something might have gone wrong during the download of the modded app, and the apk file might be corrupted. Download it again.
If you want to keep two different versions, you may need to use a cloned version of Google Camera.
If you are using an older Android version, you may need to use an older version of GCam. For example, if GCam 7 is for Android 10 and you are using Android 8 or 9, you might need to use a previous version (GCam 6 or 5).
# What are package names (multiple APKs in one release)? »
Some modders publish multiple APK files with each release. For example:
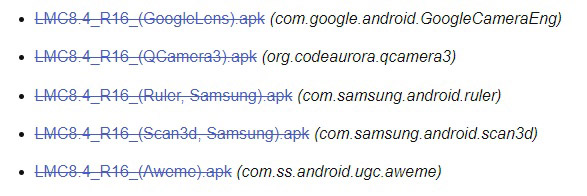
– What’s the difference between these files?
They are all of the same version but have different package names (package name is the text next to/under the download link). Each bug fix, each new feature, etc., are available in all APKs but the package name is different.
The package name is the actual name of the Android application. For example, the package name for Chrome is com.android.chrome. Users see the understandable name, but Android uses the package name.
– Why are different package names needed for Google Camera?
Package names are usually required to access all the cameras and/or enable features like Google Lens.
Some brands (e.g., OnePlus, Samsung, etc.) restrict access to all cameras. They have a “whitelist” of applications (package names) that can access those cameras, so modders release their versions with package names that are on these lists.
For example, OnePlus usually allows org.codeaurora.snapcam, so that’s what is usually recommended for OnePlus devices.
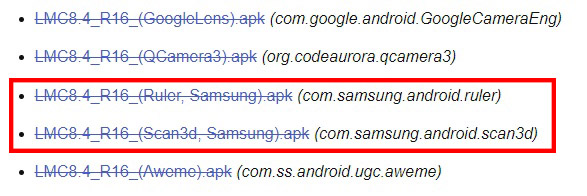
For Samsung, you will likely need to use samsung packages:
– Other usage:
Different package names allow you to install multiple GCam apps side by side. For example, in the above example, you could install all 4 APKs even if it’s the same application.
This is useful when you want to have different versions installed, so you can test a new version without removing the one you are currently using, or have different versions with different settings, etc.
– Which Google Camera package name should you use:
Since there is no rule that applies to all phones, you need to test them yourself or ask in the relevant thread or group for your phone model. With that being said, if in doubt, use the first APK. If that doesn’t work, try the second one (and so on).
However, there are some package names that usually work on most phones of certain brands. For example:
- OnePlus: org.codeaurora.snapcam (often referred to as “Snap” or “Snapcam“) or com.ss.android.ugc.aweme.
- Samsung: com.samsung.android.ruler or com.samsung.android.scan3d.
- Realme: com.ss.android.ugc.aweme.
Depending on the phone and the whitelist used by the brand for that specific phone, you may also use other package names. For example, some OnePlus devices require org.codeaurora.snapcam for all cameras to work, while some of their devices also support other names (e.g., com.google.android.GoogleCamera).
Some brands (ASUS, Xiaomi) don’t have these restrictions at all, so you can use any package name and still have access to all cameras. Most custom ROMs also don’t have these restrictions.
– Can’t get all cameras to work with any package name?
Assuming you’ve done everything correctly (tested all package names and made sure the additional cameras setting is enabled), it’s possible that your phone completely blocks access to all cameras.
Unfortunately, some brands (e.g., OPPO, Realme) impose very strict restrictions, and using a specific package name doesn’t work. Other brands allow access to some but not all camera modules. For example, OnePlus devices with Snapdragon SoCs/processors allow users to access all cameras (with the corresponding package name), while OnePlus devices with MediaTek do not (e.g., many OnePlus Nord phones).
The only solution for this is to use a custom ROM that is not based on the standard/original one (e.g., ColorOS, OxygenOS, MIUI, etc.) as they do not restrict access and do not require specific package names.
# Gcam crashes immediately after opening »
There are several reasons why GCam may crash immediately after opening:
- GCam doesn’t work on your hardware.
- The version you are using was made for a different phone.
- You are using incorrect settings for your phone.
- Camera2 API is disabled on your phone.
- The GCam version is incompatible with the Android version you are using.
- AppOps, XPrivacyLua, etc., can be the cause of the problem.
- GApps are not available.
Let’s delve into the details of each issue.
– Compatibility with your hardware:
GCam is designed for Google devices, so it only works on phones with similar hardware and software. This means it won’t work, for example, on most phones with Kirin, Exynos, or Mediatek SoCs.
Read how to install GCam to learn about the requirements.
– Incorrect version for your phone:
If you install a version optimized for a phone different from yours (e.g., some restrictions, errors, etc.), GCam may crash on your phone. I recommend you read the page how to find a suitable version or try one of the recommended versions.
– Incorrect settings for your phone:
If GCam was working fine but stopped working after changing a setting or loading a configuration file, it’s possible that some parameters that don’t work on your device were enabled, causing crashes.
Clear the app’s data or reinstall GCam to start fresh with default settings.
If this occurs after updating GCam and a clean install doesn’t work, the new version may be incompatible with your phone.
– Camera2 API unavailable or limited:
In simple terms, the camera2 API interface is how GCam “communicates” with the camera sensors on your phone. Older phones and many budget devices either don’t support this API or are sold with it disabled. In this case, when GCam tries to use the cameras, it can’t connect to them and ultimately crashes.
On some phones, it is enabled but doesn’t support all the functions required by GCam.
On some phones, the required level is supported, but the API itself is disabled. In some cases, you can enable it by editing the build.prop file (requires root). If you have root access, use an app like BuildProp Editor and add the following line:
persist.camera.HAL3.enabled=1
Note that:
- This may cause other issues (e.g., break the stock camera app).
- Sometimes this line is already available. In that case, change its value from “0” to “1”.
– Version incompatible with your Android version:
This usually happens when you try to use a version created for a newer Android version. GCam opens, tries to access some features available in the newer Android version, and since they are not there, it crashes.
In this case, you’ll need to use an older version of GCam created for your Android version.
– AppOps, XPrivacyLua, etc.:
Some privacy-enhancing tools/features can block access to what GCam needs. For example, if GCam can’t access the cameras, it won’t launch, or it will launch but won’t be able to access the camera modules.
For example, in XPrivacyLua, the “track usage” parameter is known to cause issues on phones using camera HAL fixes, so you may need to disable it.
– Phones without GApps:
If you’re using a phone without Google Apps (GApps), most versions of GCam will crash. Read below how to use GCam without GApps.
# Google Camera crashes after taking a photo »
There are many reasons for this, but it is often caused by:
- Motion photos: Unfortunately, this feature can cause problems on some phones. Disable it and try again (read more here).
- Incompatible features: Depending on the hardware used by your phone, processing may fail and result in a crash:
- Sabre: In some versions, there is a setting to disable “sabre.” It is supposed to enhance detail but doesn’t work on non-Sony sensors. In this case, disabling it should fix the crash.
- Try using a different version of GCam: The GCam version you are using may be incompatible with your phone. Try finding a more suitable one.
# Can’t view photos/videos directly from GCam »
Some versions of GCam require Google Photos to display photos and videos within GCam. If the app is not installed, GCam will return to the viewfinder mode.
[Note: You just need to install the app; there’s no need to sign in (and upload your photos to Google) or use the app.]
– GCam 7.3+:
In some versions, there is a setting to disable Google Photos (check the GCam settings). On GCam 7.3 or newer, this setting will use your default gallery app. However, most gallery apps do not support GCam features (such as motion photos) or may have processing delays.
If you don’t want to install Google Photos, there is another Google app you can use: Gallery Go. It is a lightweight gallery app without the upload feature. Install it and set it as your default gallery app, it will function similarly to installing Google Photos. Note that you don’t need to use this gallery app, just install it.
– GCam 7.2 or older:
Versions based on GCam 7.2 or older usually have a setting to disable Google Photos. This setting will use the built-in “Gallery” app, so no additional app is required. Check the settings menu to find this option*.
If it is unavailable, the only solution is to install the Google Photos app.
[* In older versions, the setting is located in the “Debugging and tools” section. Uncheck “camera.use_photos” and restart the app.]
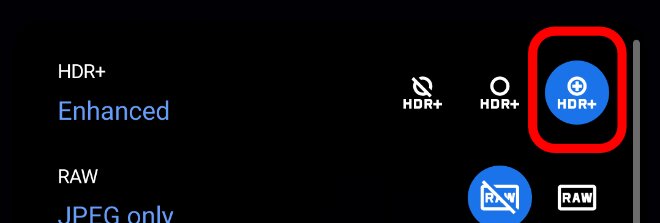
# HDR modes in Google Camera and how to fix overexposure in photos »
Google Camera supports 3 HDR modes:
- HDR Off: Disabled (no quality improvements)
- HDR On: Automatic mode (default – fast but not the best quality)
- HDR Enhanced: Forced HDR (slower but better)
(Note: In older versions, they are called HDR off, HDR+ Auto, and HDR+ On, respectively) Some versions also support “instant HDR,” which is similar to HDR On.
Use HDR Enhanced if you want to achieve the best possible quality, comparing quality (stock vs. GCam, GCam vs. GCam) and when shooting in challenging conditions. HDR On works quickly, supports zero shutter lag (ZSL) and video, but the quality is not always very good.
In GCam 7:
In GCam 6:


HDR On vs. HDR Enhanced (look at the sky):

# HDR processing hangs in Google Camera »
This issue occurs when:
- You are using older GCams on newer versions of Android.
- Something is limiting/stopping GCam’s background processes.
- You are using a cloned application.
- Sometimes, older GCam versions do not work well on newer versions of Android. Similarly, newer GCams may not work with older versions of Android. Try using a different version. For example, if GCam 6 is not working on Android 10, try GCam 7 or 8.
- Some brands force-close background apps to save battery, but GCam needs to process each image to apply HDR and its optimization. You can fix this by disabling battery optimization for this app.
- If you are using a cloned application (e.g., you may have more than one version of the same app), it can cause some issues. One common problem is image processing getting stuck. In this case, install the “original” apk.
# Why does Google Camera crash in Slow motion mode »
Slow motion mode only works on certain phones or Android versions. Most GCam versions based on 5.x do not support it, but some based on 6.x do. Make sure you have selected the correct FPS for your phone (e.g., 120 instead of 240) and check the settings menu to see if the option is available.
– Note about Android 7.x:
Older versions of Google Camera supported slow motion on many Android 7 firmware, but some phones required an updated media_profiles.xml file with high-speed profiles.
– Alternative apps:
Some users have reported that this feature works on Nokia’s camera.
# How to enable Astrophotography mode in GCam »
Astrophotography is a feature of Google Camera 7+. It is part of the Night Sight feature (also known as Night Mode). To use it, select the Night Sight mode.
– Versions that allow enabling Astro mode:
Some versions have a specific option to enable the Astrophotography mode in Google Camera. In some versions, the option is located within the settings menu. For others, it is available in a dropdown menu:

In most cases, Astrophotography mode is used only in low-light conditions when the phone is stable. If not, Night mode is used instead.
– Versions without the option:
If the setting is unavailable, it may function like the original GCam app. To use it, open Night Sight, and if the phone is stable (on a table, tripod, etc.), it will automatically activate Astrophotography mode. The mode will not work if the phone is not stationary.
– Exposure time and tips:
For detailed results, your phone needs to be stable. Using this mode handheld will result in blurry images.
The exposure time depends on the device. Some phones support only a few seconds, while others support minutes.

# How to use Motion Photos
Motion Photos is a feature that records a short video every time you take a photo, allowing you to see what happened before/after you took the photo. To view the picture/video, open the photo using Google Photos (you may need to press the play/pause button in the upper right corner).
– Requirements:
- Google Photos app: Other gallery apps only display static images, not videos.
- GCam app with the feature: Most versions based on GCam 5.x (or newer) support this feature.
- Android 8 or newer: The feature doesn’t work on Android 7 or older.
- HDR On: It doesn’t work with HDR Enhanced.
– Limitations:
- Videos don’t play in other gallery apps, computers, or when sending them through apps like Telegram, Signal, or WhatsApp.
- File sizes are larger than usual. Don’t enable this feature if you don’t need it.
– User interface:
This is how the feature looks in Google Camera 6 (in some versions, Motion Photos are disabled by default, enable it in the settings menu):

When shooting:

Available settings:

The user interface is different in GCam 7+, but it still works the same way:

– Troubleshooting if Google Camera crashes in Motion Photos:
Due to code differences between Google devices and other brands, it’s not always possible to record videos at full resolution in Motion Photos mode.
Some versions allow you to set the resolution. Some phones require a resolution with a 16:9 aspect ratio. On other phones, it will only work with a very low resolution. Try all the options if you experience crashes.
In versions without settings, the functionality of this feature should be modified by the modder. Try another version, perhaps from a different modder, to see if it works or report the issue to the developer.
If this feature causes problems and you can’t fix it, you should disable it.
# How to use multiple cameras, what is AUX, etc.
Some versions of GCam support multiple cameras (main front/back camera, wide-angle, etc.). The support also depends on the phone: you need to correctly declare the available cameras and allow camera apps to access them.
If your phone has multiple cameras and you don’t know how to use them, I recommend finding a forum thread or group (e.g., on 4PDA) and asking for help there. They can provide you with information and even offer a solution if needed.
– Enabling all cameras:
In some versions, you need to enable them in the settings menu. This feature is often called “AUX” (enable AUX, etc.). In some versions, the enable slider is located below the camera identifiers. In most cases, ID 0 = main, ID 2 = wide-angle (or additional camera), ID 3 = telephoto, etc.
After enabling, restart GCam.
– Switching between lenses:
Some versions display icons in the viewfinder:

In other versions, you can switch between modules by tapping or long-pressing the camera switch button. Read fu24’s post and Arnova8G2’s post where they explain how it works in their versions.
# HDRnet / Instantaneous HDR quality and heating
In some versions, there is a setting to enable a new HDR algorithm. It is usually called HDRnet, Instantaneous HDR, or “Fast HDR.” They should work in a similar way, but there may be some differences as Google improves them.
This feature works by constantly capturing frames in the background and saving them to a buffer. Then, when the user presses the shutter button, it uses some of these older frames from the buffer to create the final image.
This new processing allows for faster photo capture than HDR+ Enhanced, but it has some drawbacks:
- Reduced dynamic range
- Increased battery consumption and heating, especially on older devices
- Since older frames are used, the final result may differ from what you saw
It is fair to say that the quality of this mode lies somewhere between HDR+ On and HDR+ Enhanced. It’s fast, but there is a compromise in quality.
It allows for faster photo capture but not as good as HDR+ Enhanced, and it requires more hardware resources (hence the heat and battery drain). Also, since the mode uses older frames, your photos may show what happened a few seconds before the shutter was pressed.
Since different users use their phones differently, and hardware also varies significantly, you should test this feature to see if it suits your equipment and how you use the camera.
# What is “Lib Patcher” and “Libs”?
Lib Patcher and Libs affect noise levels, detail, colors, shadow brightness addition/removal, etc. Some versions of GCam do not support either, some support only one, and some have both functions.
- Lib Patcher: Users need to find the best values for their hardware. Different camera sensors require different values. Each user also has their own preferences: some prefer more detailed/noisy images, while others prefer softer photos.
- Libs: The libs are created by modders, and similar to “lib patcher,” they influence image quality, detail, etc. The main difference is that they come ready to use, and you can’t modify them.
Since all of this heavily depends on the hardware used in our phone and personal preferences, it is impossible to recommend specific libraries or lib patcher settings that would work equally well for everyone.
[ Note: If you encounter issues with loading libraries, see Why can’t I load the library? ]
# How to load a configuration in Gcam and export settings (XML/Config files)
Some versions support importing/exporting XML configuration files. Follow this guide to understand how it works.
# Fix for black and white pictures
Usually, this issue can be resolved by changing a setting in the settings menu and then restarting the application.
# What is Sabre in Google Camera?
Sabre is a merging method created by Google that enhances the quality of photos in certain modes. Some refer to it as “super-resolution” due to its sharpness/detail enhancement. It is used by Google for Night Sight, but some GCam mods also utilize it for zoom and HDR+ Enhanced. It works with the RAW10 format (other RAW formats may result in black photos).
Sometimes, Sabre is not supported by all cameras, and Google Camera crashes after capturing. In such cases, the only solution is to disable the Sabre mode in Gcam (available only in certain mods) and restart the application.
# What is “Shasta”?
Shasta or Shasta factor affects image quality, especially in low light conditions.
Higher values can help in astrophotography mode. You can also use it to control green noise in images.
# What is “PseudoCT”?
The PseudoCT switch helps control AWB (Auto White Balance). It can improve color temperature.
# What is “Google AWB,” “Pixel 3 AWB,” etc.? »
Pixel 3 AWB (Automatic White Balance) was created by BSG and Savitar and uses color calibration information from the Pixel 3 instead of your phone’s information. It differs from the white balance settings available in the viewfinder.
Other settings with similar names (Pixel 2 AWB, Google AWB, etc.) are also included in some versions of the application. Not all GCam mods contain these settings. Usually, the app works only with one of the “Pixel” models, and sometimes this can result in images looking different than they actually are (for example, yellow streetlights may appear white).
Since the results can vary from phone to phone and depend on personal preference, it is advisable to conduct your own tests to determine whether or not to use this feature.
# How to use GCam without GApps »
You can run Google Camera with microG. Download Services Core from the website, install it, restart your phone, and then launch Google Camera. No Google accounts are required.
If, for some reason, MicroG doesn’t work for you, you can manually install Google Services Framework (GSF), although this may compromise privacy. TWRP is available for Oreo and Pie. They install GSF as a system app and can support system updates:
# What is “Hot Pixel Correction”? »
Reduces the number of “hot pixels” (red dots) in the image.
# What is “Lens Shading Correction”? »
Corrects vignetting (darker areas around the center of the image).
# What is “Black Level”? »
Using a custom “black level” value usually eliminates pink or green photos on phones with this issue.
Some versions allow users to use custom values for each color channel (Magenta-Red, Dark-Green, Light-Green, Blue). This can be used to improve results in low-light conditions.
# What is “Hexagon DSP” in Google Camera? »
Hexagon DSP is an image processor available on some SoCs (processors) that enhances processing performance while using less battery. Leaving it enabled usually increases speed, but it doesn’t work on all phones.
Some APKs are labeled as “NoHex” or “NoHexagon.” Other apps have an “allow unknown devices” option that toggles Hexagon on/off.
# What is “Buffer fix”? »
The “Buffer Fix” parameter eliminates the viewfinder delay on some phones affected by this issue. However, this setting has a downside: on some phones, users have to press the shutter button twice to take photos.
# What is “Pixel 3 Color Transform”? »
This replaces the camera API2 SENSOR_COLOR_TRANSFORM1 and SENSOR_COLOR_TRANSFORM2 codes with Pixel 3 code (works for creating DNG images). It slightly alters colors.
# What is “HDR+ underexposure multiplier”? »
Adjusts the underexposure (if auto-exposure is enabled). Set the HDR+ underexposure multiplier to 50% and compare it with “normal” photos. Some users use it at 0%, but you need to test and see which value works best for your phone.
# What is “Default GCam CaptureSession”? »
Only for Android 9+. Used to capture images from the camera or reprocess images taken from the camera in the same session. More information is available on the Google developer website: CameraCaptureSession.
# What are “HDR+ parameters”? »
HDR works by combining multiple images. If you select “36,” it means Google Camera will use 36 frames/photos to create the final image. Higher values improve quality, but only to a certain point and with increased processing time. For everyday use, something between 7-12 is usually sufficient.
# “Autoexposure correction” and “Correction Night Sight” »
Controls the shutter speed. Long exposures can be used for long-exposure photos, but this doesn’t work on all phones, and users often report issues. On the OnePlus 3, long exposure only works with the “Pixel 1” model and fails with other models. Sometimes increasing or decreasing it can help correct the pink tint found in some phones.
# Portrait mode in Google Camera vs Lens Blur »
Some versions of this port come with these two features. Portrait mode works better with people and (sometimes) animals and has better edge detection. Lens blur is an older technology that works with objects, but it has worse edge detection and sometimes blurs things that shouldn’t be blurred.
# What is “Recompute AWB”? »
It is similar to other Automatic White Balance (AWB) settings. Compatibility with different devices is limited.
To see the difference, take two shots – one with this option enabled and another with it disabled – and compare the results. Depending on the GCam version you’re using, you may need to disable other AWB parameters for it to work correctly.
# What is “ISO Priority Selection”? »
This is a new piece of code, and no one knows exactly what it does, but it seems to affect the viewfinder. Ignore it.
# What is “Metering mode”? »
It changes the way Google Camera measures the scene’s exposure in the viewfinder. It doesn’t change the final image, but it can affect the dark/bright areas of the viewfinder.
Some versions come with multiple settings for this option. Some may work on your phone, while others may not do anything. It all depends on your phone’s hardware/software.
# What is video bitrate? »
Video bitrate is the amount of data (bits) transferred per second when shooting a video. The higher the bitrate, the larger the files and the better the quality. Some slower devices may struggle to play high bitrate files. Read the Wikipedia page to learn more.
Some versions of the Google Camera mod allow users to adjust this value. Usually, the default settings (or “auto”) are sufficient, but you can use higher values if you feel the video quality is poor.
# Can processing speed be improved? »
Most modes in Google Camera work by capturing multiple photos and then combining them to create the final photo (HDR). This process takes a few seconds, and during this time, you see the “processing…” notification. The processing time depends on how fast your processor is and the type of shot taken, but it usually ranges from 5 to 15 seconds.
Typically, Google Camera has three modes: HDR Off, HDR+ On (or HDR+ Auto), and HDR+ Enhanced (or HDR+ On).
In GCam 6:

In GCam 7:

HDR+ Enhanced offers the best quality but is also slower than the other two. If you’re in a hurry, you can try using HDR+ On (the middle setting).
Some versions allow you to choose the number of HDR frames. Sometimes, it’s referred to as HDR quality, HDR frames, HDR speed, etc. Try a lower value, restart the app, and try again.
There are some features that are more resource-intensive than others. Night Sight (also known as Night Mode) is one of them, and you should expect increased processing time. If your camera has a high resolution (e.g., 48MP), image processing will take longer (consider choosing a lower resolution).
# What is “Face Warping”?
Some apps allow you to enable/disable a feature called Face Warping or Face Distortion Correction. When enabled, Google Camera tries to correct lens distortion when capturing faces.
# What is JPG Quality, JPG Compression, etc.?
JPG, or JPEG, is a lossy image format. A file with 95% quality will be larger (more MB) and contain more detail compared to a file with 85% quality. Most camera apps default to using 80-85% quality. The quality of JPG images you typically find on most websites ranges from 60 to 85%.
It’s a trade-off between quality/detail and file size: an 80% quality file may be around 2MB, while a 95% quality file may be around 6MB.
Personally, I use 97% quality (or 95% when I can’t set 97%) for mobile photography. From my tests, anything below 95% starts showing compression artifacts when zoomed in. I couldn’t see any difference in image quality beyond 97%. For me, 100% quality is overkill: not only are the file sizes 1 or 2MB larger, but I don’t see any noticeable improvement in quality.
If you value quality, use low JPG compression/high JPG quality. If you are limited by storage space, reduce the JPG quality.
# What is “instant_aec”?
This is a camera2 API code from Qualcomm. There isn’t much information available about it, but it seems to be related to AEC 3D/artificial reality (the technology itself allows us to create 3D images/videos from 2D images). Here’s a video about a camera using this technology: vimeo.com/282288552.
In practice, this parameter improves quality on some devices, but it’s not available in all GCam versions or for all phones.
In versions by Arnova8G2, we usually have 3 parameters that allow us to disable/enable AEC:
0 – Disable
1 – Enable and set aggressive AEC algorithm
2 – Enable and set fast AEC algorithm
# Why can’t I download the library?
Warning: Library downloads no longer work in LibLoader versions published before 2019-07-01.
Some versions of GCam support libraries, but while some are included in the APK itself, other mods download them from a Github repository or from one of the modders’ servers.
When you click “Get Updates,” it initiates an internet connection that downloads a few kilobytes of data (libs) and saves them locally. Since libraries are frequently added, removed, or updated, the list of libraries available for the GCam version you’re using will change over time. The default Google library is included and used, so the app will still work even if you don’t download the libraries or if this feature is disabled in the future.
There are a few pros/cons compared to including libraries directly in the GCam:
- Pros: smaller APK file size; libraries can be updated/added without updating the APK;
- Cons: GCam needs internet access (only at the moment of “update”) to download the lib files;
If nothing happens 30 seconds after clicking “Get Updates,” it means the update failed. Make sure your phone has internet access, the app itself is not blocked from accessing the internet, and that Github.com is not blocked on your network.
If everything is fine on your side, try again later as the Github API rate limit can be reached, limiting all requests.

# How to fix green/pink blurry photos? »
This is usually caused by GCam using an incompatible “model” for your camera. It’s a common issue with the phone’s front camera.
The solution is to change the “model” being used. If one of the Pixel models is selected by default, try selecting the Nexus 5X or 6P model, restart the app, and try again.
# Google Camera doesn’t save photos to the gallery »
– Portrait photos:
By default, Google Camera saves photos taken in “Portrait” mode in folders within the main /DCIM/Camera folder. Some GCam versions have a setting that allows you to save them in the main shared folder. The parameter name changes from “dev” to “dev,” and it looks like this in some versions:
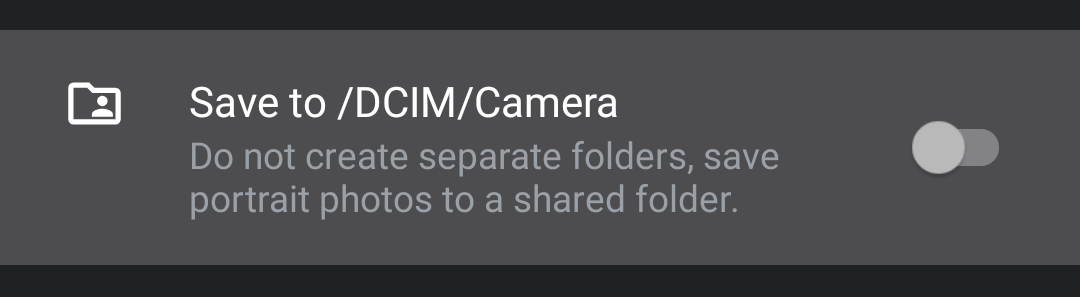
Unfortunately, this feature is not stable, and sometimes some photos get lost. The solution is to leave this parameter turned off or use a version that doesn’t do this by default.
– Other photos:
- If they appear after a reboot: it’s a system issue, Android doesn’t scan the storage fast enough to display new files in the gallery.
- If photos taken with other apps are also getting deleted: it’s not a Google Camera issue.
- If you have apps that somehow modify photos/files: make sure they are not deleting the shots themselves.
- If none of the above applies: report the issue to the developer.
# What is DCI-P3? »
Some versions come with the DCI-P3 option. On phones with displays that support DCI-P3, photos with more vibrant colors should be produced.
To learn more about this color space, check out this page on DCI-P3.
# Can GCam save photos/videos to the SD card? »
No. Since Google phones do not support SD cards, Google Camera does not have settings to save photos and videos to external storage.
You can try using a third-party app. For example, Tasker can be used to move files between folders/storage.
# How to flip selfies? »
This parameter is only available in Google Camera 7 or later versions (check the settings menu). It’s not possible to enable/disable selfie mirroring in older versions.
# How to save portrait mode photos in the main folder »
Check out this page where I explain the setting and some third-party apps that allow you to save photos taken in portrait mode with GCam in the main/DCIM/Camera folder.
# Differences between GCam 5, 6, 7, etc. »
The main versions of Google Camera are usually released when Google launches a new phone (once a year). Some of the new features may be usable with a port on non-Google devices, while others may not. It depends on how that feature works and your own hardware.
On Google devices, new versions typically mean new features and better (or at least equal) quality, but for people using the port, it may vary. When new updates are released, they need to be fixed/improved/changed to work on non-Google devices, and this work takes some time. Sometimes it’s better to use an older version than to switch to a new, unstable one.
To stay informed about new features, I suggest monitoring websites like XDA Developers, 9to5Google, etc., as they usually write about what’s new in each update. New features are also mentioned when Google introduces their new devices.
# How to create app clones »
To create clones of Google Camera apps, refer to this guide on app cloning.